
Of course we cannot always share details about our work with customers, but nevertheless it is nice to show our technical achievements and share some of our implemented solutions.
On a VM, running on VMware vSphere 6.7 and ESXi 6.7, the possibility to extend the virtual hard disk was greyed out:
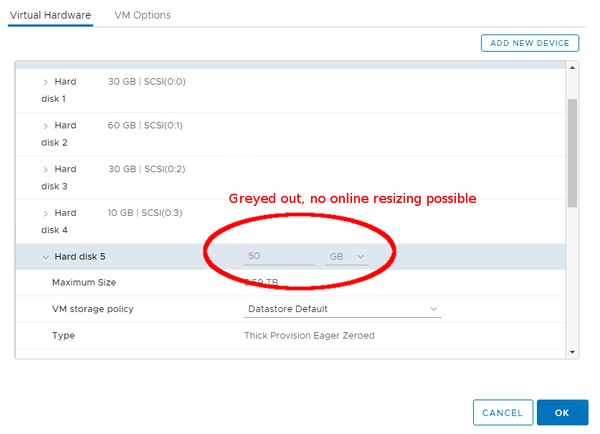
I checked with a couple of other systems and it was possible on all of them. What would be the difference between this particular VM and the others?
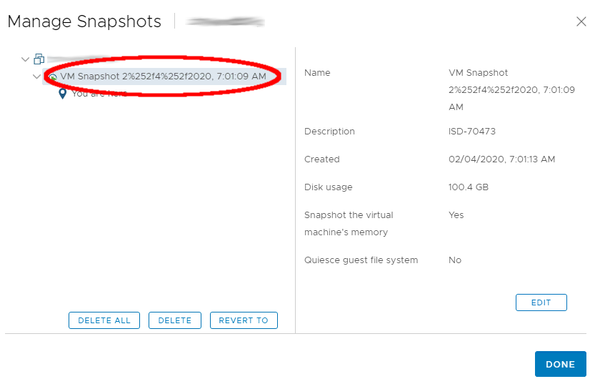
After some minutes of trying to spot a configuration, which would prevent online resizing, the reason was finally found: There was an snapshot on this VM!

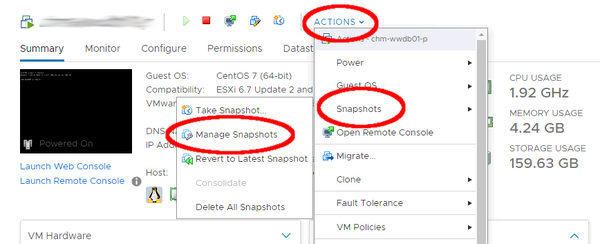
Unfortunately in the new web-based vSphere user interface, an active snapshot cannot be seen as fast as in the earlier vSphere days (VMware Infrastructure and vSphere GUI). To check if a virtual machine still holds a snapshot, the "Actions" drop down menu needs to be opened, followed by the "Snapshots" entry to then finally click on "Manage Snapshots".
And here, finally, the snapshot can be deleted:
Once the snapshot was deleted, the virtual hard disks could be (online) resized again:
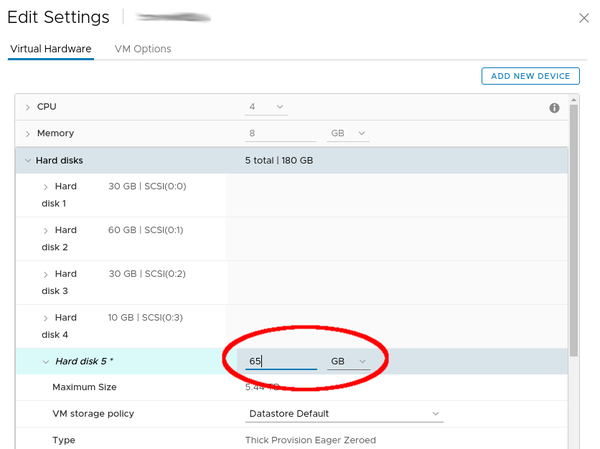
Once the virtual hard disk was extended (not shrunk!), the virtual hard drive can be extended within the operating system (here CentOS Linux), without downtime, too! This was already explained in an older article (Dynamically increase physical volume (PV) in an LVM setup on a VM) but for the sake of completeness of this article, here's the info again.
First the correct drive needs to be identified:
[root@vm ~]# pvs
PV VG Fmt Attr PSize PFree
/dev/sda5 vgsystem lvm2 a-- 6.00g 4.00m
/dev/sdb vgdb lvm2 a-- <60.00g 0
/dev/sdc vgtmp lvm2 a-- <30.00g 0
/dev/sdd vgapp lvm2 a-- <10.00g 0
/dev/sde vgdbbackup lvm2 a-- <50.00g 0
In vSphere UI the 5th hard drive had an original size of 50GB and as there is only one physical volume with that size (SDE) the drive is identified!
Note: The order of hard drives in vSphere UI does not forcibly match the order in the OS, watch out!
We can now tell the Kernel to rescan this particular drive (sde). To do this, the exact scsi device path needs to be found first:
[root@vm ~]# ll /sys/block/sde/device
lrwxrwxrwx 1 root root 0 Dec 11 08:13 /sys/block/sde/device -> ../../../0:0:4:0
And then the Kernel is told to rescan this path:
[root@vm ~]# echo 1 > /sys/class/scsi_device/0\:0\:4\:0/device/rescan
With fdisk, the new size can already be seen:
[root@vm ~]# fdisk -l /dev/sde
Disk /dev/sde: 69.8 GB, 69793218560 bytes, 136314880 sectors
Units = sectors of 1 * 512 = 512 bytes
Sector size (logical/physical): 512 bytes / 512 bytes
I/O size (minimum/optimal): 512 bytes / 512 bytes
Resize the PV:
[root@vm ~]# pvresize /dev/sde
Physical volume "/dev/sde" changed
1 physical volume(s) resized or updated / 0 physical volume(s) not resized
And voilà, the new space is available in the VG:
[root@vm ~]# vgs
VG #PV #LV #SN Attr VSize VFree
vgapp 1 1 0 wz--n- <10.00g 0
vgdb 1 1 0 wz--n- <60.00g 0
vgdbbackup 1 1 0 wz--n- <65.00g 15.00g
vgsystem 1 2 0 wz--n- 6.00g 4.00m
vgtmp 1 1 0 wz--n- <30.00g 0