
Of course we cannot always share details about our work with customers, but nevertheless it is nice to show our technical achievements and share some of our implemented solutions.
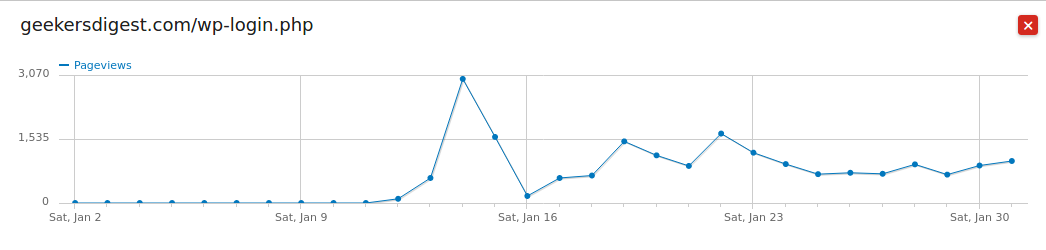
Every Wordpress administrator looking at site statistics becomes quickly aware that one of the most requested URLs is /wp-login.php.
Ever since Geeker's Digest was launched as a side project, which is using Wordpress, the requests to this path increased and remained high at an alarming rate:
But what's the problem about this? Well, this is quickly explained with a comparison.
Imagine someone stole your debit card and wants to withdraw money from an ATM/cash machine. The thief would have to guess the correct PIN combination at maximum three attempts (this is the default anyway). After the third unsuccessful attempt, the card will be blocked and is unusable. Your money is safe.
The problem with wp-login.php is that there is no such security limit in place. Attackers can attempt as much logins using unlimited combinations of user and passwords as they want. And don't be fooled that a hacker would actually enter credentials manually - no these are programmed scripts (bots) which automatically use all sorts of login combinations. The login attempts go on and on and on... Until a successful combination was used and the attackers gain access to the Wordpress backend. This method is called brute force attack.

Probably the easiest way to prevent these attacks is to restrict access to the Wordpress login paths (which are /wp-login.php and /wp-admin/). If you are the only person logging into the Wordpress backend, the access can be allowed for your own public IP address but denied for all others.
An Nginx configuration (here being used as a reverse proxy in front of the Wordpress web server) to achieve this could look like this:
location /wp-admin {
allow 123.123.123.123; # my own public ip
allow 199.199.199.199; # the public ip of my friend
deny all;
include /etc/nginx/proxy.conf;
proxy_pass http://upstream;
}
location = /wp-login.php {
allow 123.123.123.123; # my own public ip
allow 199.199.199.199; # the public ip of my friend
deny all;
include /etc/nginx/proxy.conf;
proxy_pass http://upstream;
}
Such an IP-based restriction can also be placed directly in the .htaccess file in the DocumentRoot of the Wordpress website. This requires that Wordpress is running on an Apache web server and the Virtual Host config has AllowOverride defined (usually should already be the case for permalinks, etc):
root@linux:/var/www/wordpress# cat .htaccess
# IP restriction on Wordpress login
<Files wp-login.php>
Order deny, allow
Deny from all
Allow From 123.123.123.123
Allow From 199.199.199.199
</Files>
# BEGIN WordPress
# The directives (lines) between "BEGIN WordPress" and "END WordPress" are
# dynamically generated, and should only be modified via WordPress filters.
# Any changes to the directives between these markers will be overwritten.
<IfModule mod_rewrite.c>
RewriteEngine On
RewriteBase /
RewriteRule ^index\.php$ - [L]
RewriteCond %{REQUEST_FILENAME} !-f
RewriteCond %{REQUEST_FILENAME} !-d
RewriteRule . /index.php [L]
</IfModule>
# END WordPressroot
But what if your blog needs to be accessed from multiple user which log in from many places and therefore from multiple IP addresses? In this case you should consider a rate limit approach.
A rate limit can help slowing down these automated brute force attacks - yet still allowing user logins at a "normal rate" to continue. There are multiple ways on how to configure a rate limit.
If you are using Nginx as web server for Wordpress or as a reverse proxy in front of the Wordpress web server, you can easily configure rate limits.
The following example creates a connection limit zone named "wordpress". On the login paths, the limit zone is applied with a value of "1", meaning 1 request per second (per IP address):
limit_conn_zone $binary_remote_addr zone=wordpress:10m;
server {
[...]
location /wp-admin {
include /etc/nginx/proxy.conf;
proxy_pass http://upstream;
}
location = /wp-login.php {
limit_conn wordpress 1;
include /etc/nginx/proxy.conf;
proxy_pass http://upstream;
}
}
Note: The limit should not be set to the wp-admin path as a successful login into the Wordpress backend will require multiple requests within /admin.
If you have no access to the web server configuration, you may also use Wordpress plugins to achieve some rate limit restriction on your blog. I've made quite good experiences with the Limit Login Attempts Reloaded plugin. Once installed and activated, the plugin stops excessive logins from the same IP address and blocks the IP address after several unsuccessful login attempts. The plugin is configurable and the limits can be adjusted (for example how many retries after a failed login is allowed).
The plugin can be configured to automatically send an e-mail whenever a lockout was triggered. In the logs tab, the previous blocked IP's are shown, right next to the username which was used for the login:
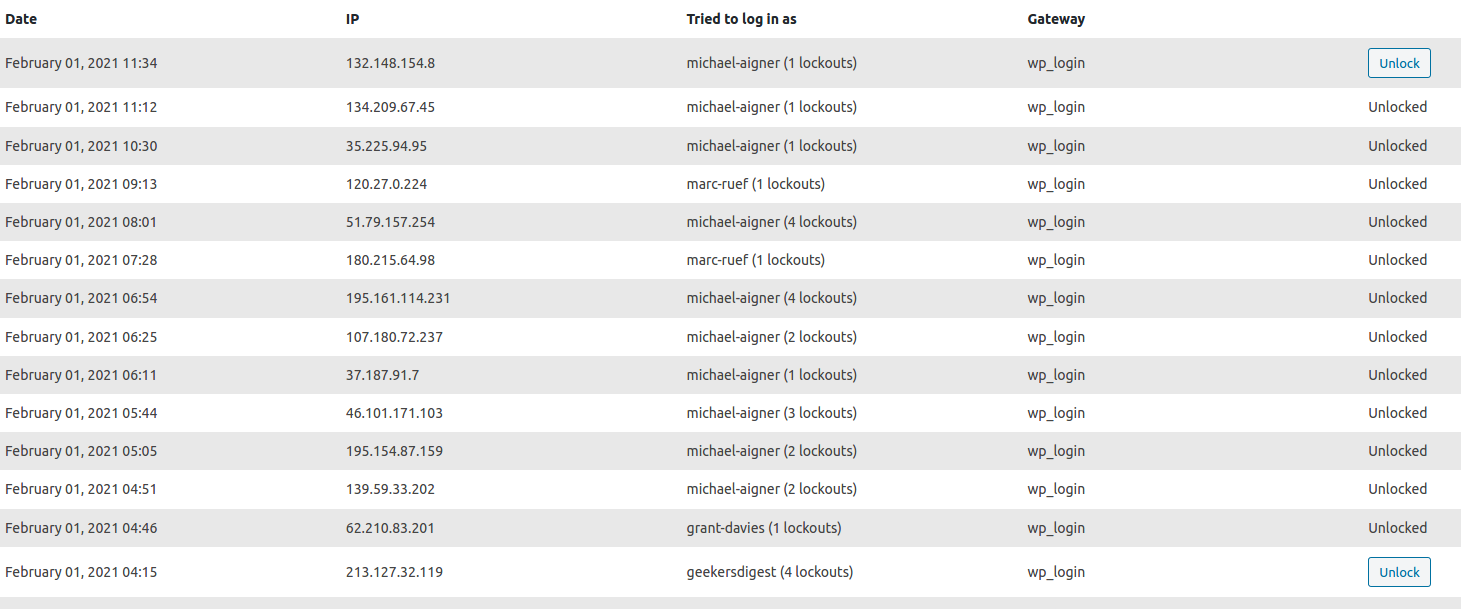
Interestingly the attempted logins only happened with real user names, not with some random ones. How did the attackers know about them? Read on.
The scripts which try to brute-force logins on Wordpress certainly do not lose much time before they start the attacks. Even on newly created Wordpress sites. To avoid unnecessary combinations with an unlimited amount of user names and passwords, the scripts already rule out the first piece: The user names. As Wordpress sites (usually) have an author page, the user names are nicely listed. And each Wordpress has an internal author redirect URL, which is the same (by default) on every Wordpress: /?author=1.
The problem in this case is that this URL (/?author=1) redirects to the profile page of the author with ID 1, which shows the real username in the address bar. In case of an e-mail address as user login, the username is shown without the @-sign and the dot is replaced by a dash. Example: A Wordpress username of "me@example.com" would be shown as "meexample-com". Intelligent scripts therefore immediately know the user name to use in a brute force attack.
To "hide" the real user name, another Wordpress plugin is a great help: Edit Author Slug by Brandon Allen. It allows to rewrite the URL (slug) for each author, therefore hiding (or renaming) the original login username.
The plugin adds an "Edit Author Slug" section into each Wordpress user profile and can be edited in the Wordpress Admin Backend:
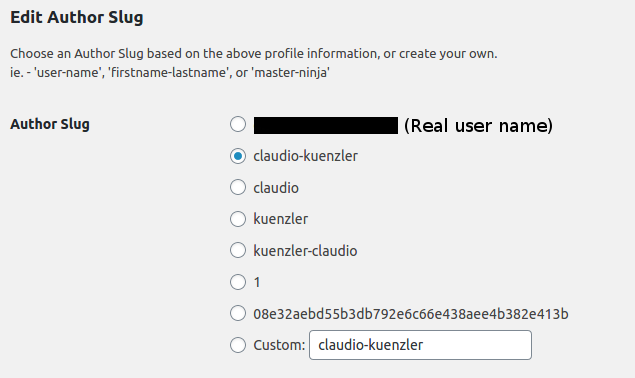
With this method, the automated brute force attacks are misled and are using non-existant usernames for the login attempts.
Wordpress comes (by default) with a file xmlrpc.php. This file allows to remotely execute tasks in Wordpress, given a successful login. This login happens directly on /xmlrpc.php using POST parameters. When the correct login credentials were submitted to xmlrpc.php, the response contains a different output than without a successful login. Basically this means that xmlrpc.php can be compared to wp-login.php as an attacker can use both paths for brute force login attacks.
However only very few third party tools use xmlrpc.php (unfortunately the official Wordpress mobile app uses it) and it is not needed by Wordpress itself. Additionally to this, the XML-RPC connection, which this file provides, is considered a legacy way for remote task execution and is replaced by the newer Wordpress REST API. This means it can safely be disabled or the access to it can be restricted. In the following example for Nginx, the access to location /xmlrpc.php is simply denied:
location = /xmlrpc.php {
deny all;
}